Specific outcomes
By the end of the topic, I should be able to:
- identify parts of an egg.
- select eggs for incubation.
- identify suitable sources of chicks.
- describe broodiness and natural brooding.
- describe brooder and brooder management.
- describe conditions necessary for artificial incubation.
- describe rearing systems.
- describe the feeding for each age and category of poultry.
- state the causes of stress and vices in poultry.
- state control measures of vices and stress.
- describe marketing of eggs and poultry meat.
- select sort and grade eggs for marketing.
- demonstrate an appreciation of poultry production as an economically lucrative activity.
Introduction
The term poultry refers to all kinds of domestic birds kept for meat or egg production. They include chicken, turkeys, ducks, geese, guinea fowls, ostriches and pigeons. The management of poultry aims at production of high quality eggs and meat, to meet the ever increasing market demand.
In this topic, we shall discuss the rearing of chickens which are the most common domestic birds.
Parts of an egg
An egg is a product from female birds. It is made up of the following parts:
- York
- Chalaza
- Albumen
- Shell membranes
- Air cell
- Shell
Yolk
This is the yellow part found at the centre of the egg, held in position by chalazae. It is quite rich in lipids, proteins, vitamins, minerals and pigments. The yolk is the major source of food for a developing embryo. It has a germ spot which develops into an embryo upon fertilisation. A fertilised germ spot is called a blastoderm, while an unfertilised one is called a blastodisa.
Chalaza
These are two twisted “mucin” fibres that suspend the yolk at the centre of the egg. It ensures that the germ spot is always facing upwards. They are attached to the shell membranes on both ends of the egg and to the yolk.
Albumen
This is the clear-jelly like part of the egg that turns white when cooked. It is the largest part that makes 57% of the egg weight. It bouys the yolk. It acts as a shock absorber. Provides nutrients for the developing embryo.
Shell membranes
These are the two clear films that lines the egg shell. They are made of proteins and polysaccharides. The two membranes separate on the broad side of the egg to form the air space. They protect the egg from bacteria invasion, determine the shape of the egg and allows gaseous exchange.
Air cell (air space)
This is a space on the broader end of an egg where the two shell membrane separate. When an egg is laid, the air cell is not usually present but forms later after the egg contents have contracted due to lower temperatures outside the body, thus forming an air cell. It allows gaseous exchange.
Egg shell
This is the outer covering of the egg. The shell is made up of calcium carbonate 94%, magnesium carbonate 1%, calcium phosphate 1% and protein organic matter 4%. It is porous to allow for gaseous exchange. Egg shells provide protection to the egg contents and prevent entry of micro-organisms.
Egg incubation
Egg incubation is the provision of suitable conditions for the embryonic development of a fertilised egg. In chicken, this takes 21 days. There are two methods of egg incubation, i.e. natural and artificial incubation. To ensure high hatchability, the farmer should select eggs with good qualities.
Selection of eggs for incubation
Eggs for incubation should have the following qualities:
- Fertilized, keep cocks with hens in the ratio of 1:15.
- Medium sized, about 57 grams.
- Smooth shell.
- Clean to ensure shell pores are open.
- Free from cracks.
- Free of internal abnormalities such as blood spots, meat spots, or double yolks.
- Between 1 – 10 days old.
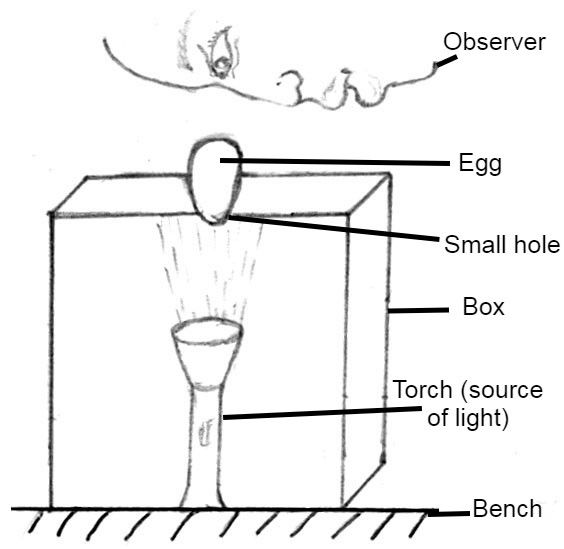
Egg candling
This is the process of examining eggs against a bright beam of light in a dark room. Egg candling helps to detect any tiny cracks on the egg shells, presence of double yolks, meat and blood spots in an egg.
NOTE
Young layers laying for the first time will not have proper developed nutrient deposition mechanisms, hence their eggs have low hatchability and are not suitable for incubation.
Methods of incubation. Natural incubation
Natural incubation
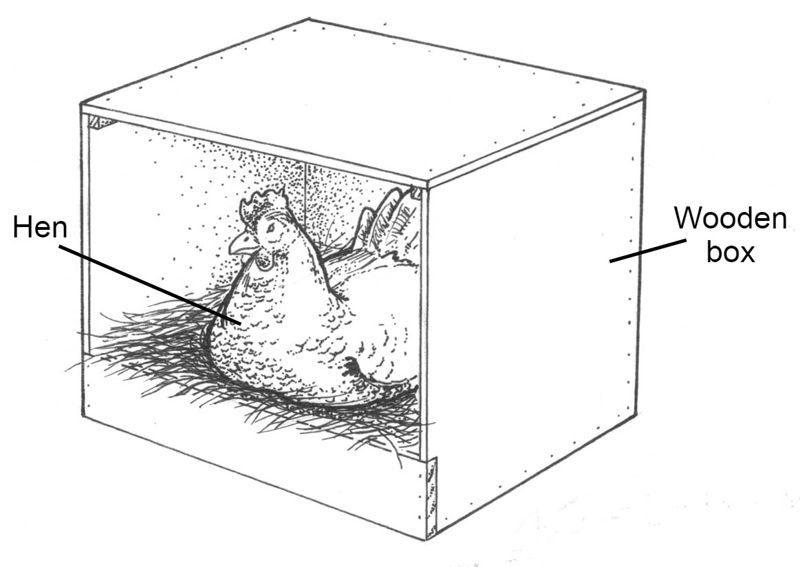
This is where a broody hen sits on the eggs. The hen provides the necessary conditions for incubation, e.g. warmth and turning the eggs. The hen sits on the eggs for 21 days for successful embryonic development. A broody hen shows the following signs:
- Prolonged moulting.
- Tendency to sit on an egg after laying.
- Number of eggs laid are few.
- Plucking off feathers from the abdomen/breast region.
- Produces a characteristic crackling sound.
- Aggressiveness.
Advantages of natural incubation
- Less skills are required.
- It is less laborious as the hen turns the eggs and provides appropriate temperatures.
- It is a cheap way of multiplying the birds.
- Hatchability is very high compared to artificial brooding.
Disadvantages of natural incubation
- It is only possible with breeds which go broody.
- Only a few chicks can be hatched hence it is suitable only for small scale poultry farming.
- Egg production is decreased as the hens remain broody for a long time.
- It is difficult for the farmer to plan when to incubate because it entirely depends on whether the bird is broody or not.
Preparation and management of natural incubation
For natural incubation to be successful, the following preparations and management practices are necessary:
- Ensure the hen is completely broody i.e. shows the ability to sit on eggs for long hours. The broodiness in hens can also be induced by use of China clays.
- Prepare the nest in a secluded part of the poultry house. The nest can be a wooden box or an earthen nest (saucer shaped) lined with some nesting materials.
- Give an appropriate number of eggs depending on the body size of the bird. Small sized birds can sit on 8-10 eggs, while large birds can accommodate 12-15 eggs.
- Set the eggs in the evening or at night, but not in the morning so that the chicks will start emerging on the evening or night of the 21st day. When the chicks start emerging in the morning, the hen will walk out with a few chicks and leave the unhatched ones to die.
- Dust the hen with appropriate pesticides regularly so as to control external parasites, such as mites, stick fleas and lice.
- Allow the bird to occasionally move out to scratch, exercise and defaecate.
- Provide the broody hen with feed and water.
Artificial incubation
Under this method, all the conditions necessary for the hatching of the eggs are provided artificially. It is done in an equipment called an incubator. For successful artificial incubation, the following factors must be considered:
Temperature
The temperature during incubation should be maintained at around 380C. Higher temperatures above 390C are lethal due to dessication and may increase activity within the egg, which results in a lot of carbon (VI) oxide being produced, killing the embryo. At 360C, very few chicks develop. Modern incubators have their temperature automatically regulated. Eggs are usually stored at temperatures of 130C. Once put in the incubator, the initial temperature should be about 350C, and thereafter increased gradually to 380C to minimise death of embryos due to temperature shock.
Relative humidity
This must be maintained at around 86%. A relatively higher humidity leads to low moisture evaporation within the incubator which results in dampness. This dampness predisposes the eggs to infections from the humid air. The consequence is high mortality in the hatched chicks. Low relative humidity increases the rate of evaporation leading to desiccation of the embryo.
Ventilation
For higher hatchability, proper air circulation must be maintained in the incubator. Poor ventilation leads to increased accumulation of carbon (IV) oxide in the eggs thus leading to death of embryos.
Egg turning
This is quite important in the management of an artificial incubator. If eggs are not turned, hatchability will be low. This is because the embryos get stuck within the egg shell and fail to come out. Under natural incubation, the hen usually turns the eggs every one hour. In artificial incubation, eggs must be turned after every 4 hours. Do not turn the egg within the last 3 days of incubation as the chicks have already positioned themselves ready for hatching. Modern incubators, however, have automatic turning devices.
Hygiene and sanitation
Incubators must be fumigated after every hatching period using potassium permanganate. The incubation room should always be kept clean. This is done to reduce chances of infection of the chicks.
Management of the incubator
The following must be observed for artificial incubation:
- For simple incubators, eggs are turned at 1800 every 4-6 hours except during the first and last three days of incubation since these are the critical stages of embryonic development.
- Remove any broken eggs.
- Maintain the temperature at the set range of 37.50C - 39.00C.
- Add water as necessary to maintain the correct relative humidity.
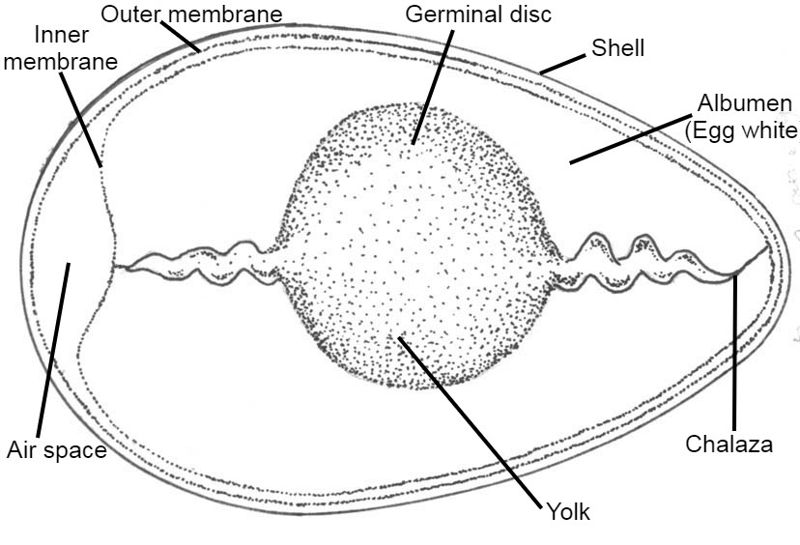
Fig. 1.4: Artificial incubator.
Advantages of artificial incubation
- Many chicks can be hatched at once. Incubators can hold up to 3,000 eggs at a time.
- A farmer can plan when to incubate.
- Egg production is not affected by incubation as the hens do not go broody.
- Suitable even for breeds that do not go broody.
Disadvantages
- Requires a higher level of management skills than the natural method. Any mishap can lead to total loss. e.g.. failure to maintain the right temperature.
- An incubator is expensive to purchase.
- It is labour intensive.
- It is only viable in large scale hatcheries.
- Have a lower hatchability than natural methods.